WHEEL BUILDING
Gathering information
Make a note of the direction of the spokes, both inner’s and outers. Make a drawing of the spoke patterns and note
how they cross and how many holes before the spoke repeats itself.
Before dismantling measure the offset at the brake drum by placing a straight edge across the brake drum flange and measure the distance from the inside of the straight edge to the edge of the rim, record this measurement. Quite often Honda hubs are simply central i.e. no offset.
If replacing bearings it is easier to remove the bearing retainers now as you will have the rim for some grip/purchase as the retainers can prove difficult. See Special tools section for the tool I made up to help loosen the retainers. Another idea would be to put a couple of suitable sized bolts in a vice at the required spacing, lower the retainer on to the bolts and turn to remove. My retainers had cold welded to the hub and as such ended in the scrap bin and a trip to the local breakers yard followed.
Now dismantle the wheel by slackening all the nipples, note that the outside spokes have a different head angle to the inside spokes, make a note then remove all the nipples and spokes.
Building
Put the inside spokes in first with a nipple screwed on by only a couple of turns. Try to keep nipples sat right into
the rim pushing the hub round, this will help to determine the next spoke position.
Don’t forget you have spoke holes running in opposite directions and each direction has an inside or outside drilling.
Once all the inside spokes are in place you can now place the outside spokes into the hub. Spring the spoke into the relevant hole position and screw the nipple on, repeat this until all nipples and spokes are fitted.
Screw all the nipples evenly by amount of thread showing. Start to tighten spokes with a spoke key by starting at the valve hole. Keep tensioning and truing as required to true the wheel.
Truing
True it radially first, it is easier to true with not too much tension on the spokes if the rim is at a high point then tighten about ten spokes at the opposite side of the rim, if it dips too much in towards the hub then slacken around ten spokes on the opposite side. You can true the sideways using the same procedure, move the rim to the right by slackening 6 spokes on the left and re tightening on the right side.
Once true tension each spoke, starting at the valve hole until a nice ring is heard when the spokes are tapped with a spoke key, any dull notes should be tightened once they are all tight a final true will be required.
When all is tensioned and true check final offset measurement and adjust if necessary.
I have just finished a pair of wheels and consider that armed with lots of patience, it is possible for the average home mechanic. If it all goes horribly wrong, slacken all the spokes and take it to a specialist wheel builder like C Wylde & Son Motorcycles
Wheels
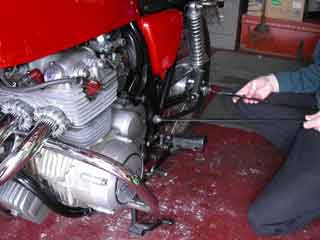
Removal of the rear axle can be a problem, a metal drift and large hammer are often needed. The problem is that the axle corrodes on the Collar A, RR. Axle distance p/no.42620-286-000, oxides form and stop its passage through the bearings. I have tried using ACF50 on the Collar A this time, whether it helps will be reported the next time I change the rear tyre.
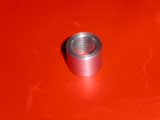
Here are the two replacement stainless steel spacers I made for the rear wheel. The spacer (with central groove) goes against the brake plate, the plain (shorter of the two) goes next to the sprocket. The inner diameter is 17mm, outer 30mm. Lengths are 33.7mm and 29.6mm. The smaller front collar is also shown. Easy to make these if you have access to a lathe, but the stainless isn’t tool friendly!.
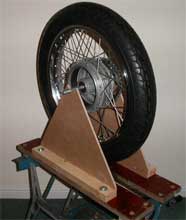
This is my home made static balancing jig bolted to a workmate. The front wheel was OK but once a rear required a 42g weight opposite the valve. Weights are not easily found for spoke wheels these days and you may have to use the stick on type intended for cast wheels. This arrangement can also be adapted to build and true a wheel. Some form of pointer close to the rim will help identify any eccentricity.
UK riders try Joe Hughes International for a screw on balance weight in 26g and 42g weights, around £4.00 each in 2004. Although expensive they look good and are re-usable. The old lead (cheap) weights are now illegal in EU countries.
 Tip:-
Tip:-
Before replating the rear axle and swinging arm pivot bolts, I used a lathe to centre mark each end with a small dimple. This I use as a reference when aligning the back wheel, Hondas markings are not that accurate and are difficult to see anyway after powder coating the frame. A pair of calipers can now be used to measure both sides for perfect alignment giving best possible machine handling and maximum tyre, chain and sprocket life.