Rear carriers Both Ventura and ‘Hepco & Becker’ still list rear carrier racks for this machine. I chose the Ventura luggage system. The fit is very accurate and may cause the seat not to open fully if a pattern seat is fitted (measure against the genuine seat first). It only took 5 minutes to fit, looks tidy and you don’t have to move the indicators. These are now a special order for this model so, allow 6-8 weeks delivery. I bought the H009/S L-brackets, PF11/S Pack rack and the SR11/S Sport rack for maximum versatility.
WARNING: The Ventura racks are for very light loads only (<10lbs) and not suitable for a top box.
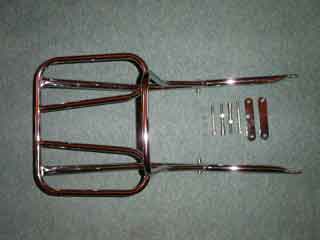 Rickman carrier after re-chroming.
If using a top box try to find an original Rickman carrier as above from the 1970’s, I’ve had a £15 example re chromed for £56 in 2007. A small Rickman decal is available from Classic transfers if you’re one for the finishing touches.
Engine bars I found a rusting pair for a tenner and had them re chromed for £45. David Silver Spares now stocks these, not quite wide enough to protect the exhaust but useful crankcase protection.
Electronic ignition – Boyer Bransden, Dynatek and Newtronic (formerly Piranah) all make systems for the CB400F. I chose the Dyna ‘S’ DS1-1 ignition as it is self contained behind the points cover (i.e. no black box to find a home for).
Fitting the ignition and DC1-1 coils:-
1 Remove stock ignition coils from under the tank, now remove aluminium brackets from them. The Dynatek coils have a slightly oversize mount of 12.7mm(0.5in), I milled out the brackets by 2.3mm then fitted the coils with stainless M5x20 screws. You may have to hacksaw/file/grind these if you don’t have access to machine shop facilities.
2 Mount the coils on the frame, then cut all wiring to the correct lengths. Use wire and bullet connectors from old coils or use new 6 amp wiring, bullets & recepticles (see Electrical notes) for the primary side and always new 7 or 8mm silicone copper HT lead for the secondaries.
3 The advancer assembly on my bike needed cleaning before adding the Dyna magnet assy.
4 The Dyna ‘S’ ignition fitted without any problems & started first time. The ignition timing was setup using a timing light and that’s it.
Worth noting: I have used points and condensers for over 35,000 miles and they have never let me down. Well maintained and setup correctly they are excellent. Why change then you may ask, well cost is one, a pair of ND points and condensers is over £30 every 6,000 miles and it doesn’t require any maintenance. Never forget that an electronic ignition failure is a long push home, maybe keep the old ignition plate assembly ty-rapped to the frame somewhere? Another requirement for electronic ignition is a well maintained battery.
Dyna offers 5 or 3 ohm coils for this bike, Dyna now recommend the 5 ohm version. While the 5 ohm spark maybe smaller than the 3 ohm version, it will be less of a burden on the marginal generator.
Conclusions
The engine seems to idle well and acheive top speed a little more easily. Might be the placebo effect but I think it also pulls better at low revs. One less item to service from now on. I’m using the ‘Dyna originally recommended’ green 3 ohm coils without problem so far but I do have a 35W headlight.