Model 76K-1302 c1970’s replacement part.
WARNING:- From my own experience and that of other web postings I think it wise to have these refurbished before use. The fluid used for damping seems to form deposts of wax, blocking the oil ways and seizing the damper rock solid. Ikon can provide this service or for the brave hearted have a go yourself, I hope the following is of help:-
The 11.75mm top seal is no longer available, maybe the seal from the later 7610 could be converted. The inner seal is a standard nitrile o-ring BS214 1″x1.25″. In my case all the seals are still serviceable.
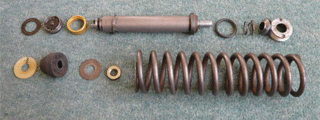
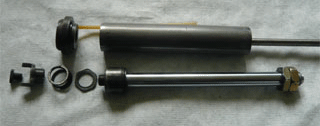
1 Remove the springs using some form of compressor clamps and remove the top split collar. Now remove the top mounting eye, lock nut, bump stopper, protection sleeve, 3 way adjuster and split plastic collar.
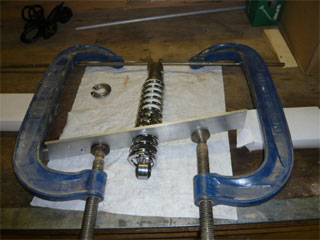
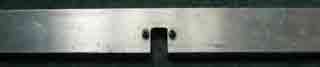
2 Below is my home made peg tool, a piece of aluminium bar & 2 bolts. Used to unscrew the top seal retainer, this is the hardest part.
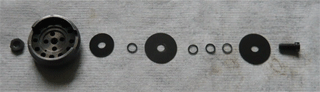
3 If you can remove the o-ring with a dental pick the inner cylinder may slide out easily, if not heat the outer body a little and pull hard. Remove the damper rod/piston from the inner cylinder and invert, now using a metal drift knock out the top guide. Remove the bolt from the damper rod piston and unscrew the adjuster dogs, removing spring and by-pass valve washer. I would have liked to remove the piston & non return valve also but attempts to uscrew this failed, let me know if you have a technique for this.
4 Clean all the internals. It is quite common to find a deposit of wax around the top guide & bottom piston and maybe blocking one or all fluid passages. Physically remove the bulk of it from where you can, pay attention to oilways and between the non return valve spring washers on top of the piston. It seems pretty resistant to solvents, I soaked in paint stripper (liquid type Nitromors, not the jelly type), blew compressed air through passages, then heated with hot air gun and used more compressed air. Repeat as necessary till clean as possible.
5 Strip old laquer from aluminium components, polish and re-lacquer. I also painted the plastic sleeves as these were discoloured with age/use.
6 Strip old paint from main springs if necessary using paint stripper and then have them mirror polished & chrome plated to complement the look of the Honda originals or re-paint red or black to keep the Koni traditionalists happy.
7 Refill bodies with 70mL of SAE5 suspension fluid. To do this hold the inner cylinder upside down, place the bottom spacer, brass collar, bottom valve and shim on top, now slide the outer body over till seated and invert. Now add the 70mL of suspension oil to both sides of the inner cylinder. Insert the damper rod/piston, top guide and o-ring and as you screw down the top seal there should be no excessive resistance till the thread is flush with the top of the outer body. If you have resistance with 1/4 of the thread still showing back off a little and try shaking and tapping the outer body.
8 Check damping and oil tightness by pushing and pulling the damper rods. The damping is adjustable with main springs off by pushing down the damper rods until the dog drive engages with the bottom valve, turning clockwise for more or anti-clockwise for less. Standard damping is fully anti-clockwise, max damping is approx 2.25 turns clockwise.
9 Re-fit outer parts in reverse order.
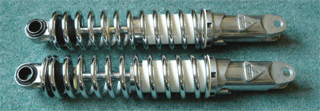
10 Installed on to my Honda CB400F, first impressions are kicking the bike off the centre stand they seemed to have little give in them. Out on to the road they absorbed imperfections in the road surface with ease and gave a comfortable ride. I may try setting up the front suspension damping to suit at a future date.
Extra:-
My shocks were from a scrap yard and the bottom mounting threads were stripped. I took the chance to Helicoil to Honda’s standard M10x1.25mm thread from Koni’s 3/8ths BSF thread.
Due to thermal breakdown, contamination & leakage of the damping oil, it is recommended to change it every 12,000 miles.
Testing rear shock absorbers – press down the rear of the bike as far as you can, releasing it at its lowest point. It should rise back up smoothly in a controlled manner.
Used for 3 years (5,600 mile) and no problems at all, making it a worthwhile job. Project cost in 2009 was £60 plus £50 for the shock absorbers.