The trip meter Knob is moulded onto the shaft and is also too large to pull through the case hole even after the sealing grommet has been carefully removed. To dismantle the clock for refurbishment I did the following:-
1 Remove the stainless steel sealing band from the case using 3/16″ screwdriver blade. Working on the underside only, you can lever against the instrument housing to lift the lip a little at a time, slowly working your way round. Do not use twisting motion, just apply outward pressure. Try to lift the band just sufficient to allow removal over the instruments joint.
2 Remove the two screws found at the back of the clock, these are sealed with green paint.
3 Using leverage from a small screwdriver, separate the two clock halves, removing the bottom casing.
Now you could just cut the plastic of the trip knob and try to find a similar replacement to glue in its place or…
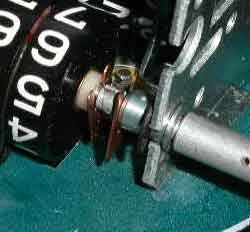
4 Some careful local heating (hot air gun or cigarette lighter) of the knob shaft is necessary to melt the thread locking compound. Hold firm with snipe nose pliers between the two copper clips and unscrew the knob assy shaft (holding where hole is far right of picture) clockwise with pliers. The thread is left hand, so think you are tightening rather than slackening. Steps 5 to 10 are necessary only if the trip meter knob will not unscrew.
5 Next to the hundreds digit there are two copper clips, remove the one nearest the trip meter reset knob.
6 Remove the circlip also nearest the trip meter reset knob.
7 Pull the reset knob outwards to allow the removal of the nylon gear wheel next to the 10th’s digit.
8 Now remove the exposed circlip and also the other clip by the hundreds digit.
9 Make careful notes of where all clips, dogs etc. live! for future re-assembly.
10 Pull the entire shaft/knob out of the casing, the top case can now be removed.
11 Carefully remove the trip meter grommet from the case. A knife may help to break the seal of contact adhesive.
12 Blast clean all rusty outer casings, apply primer and final coat of satin black paint. Bake the paint on for around 30 minutes @ 75C if possible to give better chip resistance.
13
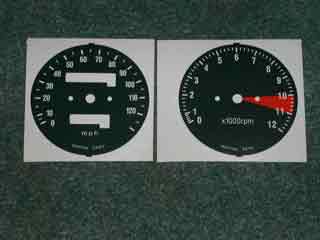
Get replacement decals for the faded faces, trip and mileometer overlays, trip meter grommet, new glasses if scratched or broken and a comprehensive guide. A service is also provided for those who do not wish to tackle the job themselves, see me for contact details. For European KPH dials I have seen these listed by seller h-4-f on the Italian eBay site.
For a custom look I printed these onto A4 Matt white, self-adhesive vinyl using a Samsung laser printer. In this case the needles were painted satin black with red tips.
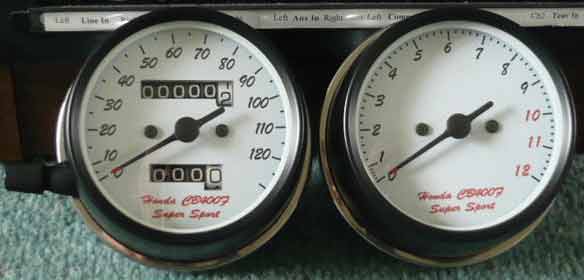
I gently removed the old silk screened finish with white spirit and fine wire wool and applied the decals. A dab of red paint on the needle tips and I was ready to start the rebuild.
14 Re-assemble in reverse order. The ring is a tight fit, consider sealing to make water tight, i.e.the two rear screw heads & around the cable thread use modellers green gloss paint and the trip reset grommet, use contact adhesive. To protect the new paintwork use masking tape on the bodies and remove as soon as the ring has been crimped.
15 Re-crimp the stainless steel band using pliers, grip the band and exert a rocking type movement to push the ring back toward the clock body, trying to exert an even pressure all-round. Some strips of leather will help protect the ring and clock paintwork while doing this operation. PS. The tacho is much easier to dismantle.
NOTE: After refurbishment any marks on the instrument seals will always arouse suspicion to a buyer. Try to keep your work invisible if at all possible. Also don’t for one moment think that this job is either quick or easy but the end result is worth while on a show bike.
Other: Tachometer ratio is 7:1 and all Honda speedometers are 2,240 cable revolutions per 60MPH.
WARNING: Replacement speedo cable for all versions has been superceded by part number 44830-425-870. I suspect this is slightly longer for the US version, it measures 93cm. With the extra length it WILL rub on the front fender and damage the chrome plating. Protect the area of contact with 3M Scotchguard paint protection film or similar or maybe try a slightly different route for the cable.