WARNING:-
1970’s Brake linings may contain asbestos. Take care especially when working on the rear drum brake, the dust can collect in here. As with aerosol painting use a high quality face mask.
Tips:-
Clean the brake pads & rotor with brake cleaner fluid from time to time . I did mine and couldn’t believe the improvement .
Pump out the caliper piston before draining the hydraulic fluid from the system if replacing pads or servicing the piston/seal.
Replace the bleed nipple with a stainless replacement (Inox Fasteners). Note: the Honda bleed nipple is non-standard, being 2.25mm longer than normal. To remove a corroded/seized nipple soak in quality releasing fluid for days and apply lots of heat. Should the nipple still refuse to move or snap off spark erosion is the only answer try SEP-Kegworth
EBC ‘Kevlar’ pads are the best available for this bike. These have a coating on the outer edge of the pad that may foul the cylinder, some fettling may be required. EBC also list a carbon steel disc rotor for this machine MD1034LS (not imported into UK).
Fit Earls stainless steel braided hoses, these don’t swell under pressure and therefore give more power to the slave cylinder. Available in kit form from Inox Fasteners– state whether you want to keep the bottom rigid pipe or not.
Front brake disc measures 7.035mm when new and the minimum thickness is 6mm. After 44,000 miles my disc measures 6.995mm, doubt I will ever manage to wear it out, even if I have it skimmed at some time. If you need a disc manufactured try:- ISR
Replacing front brake light switch can be expensive at aroud £25. If the 3 way joint were re-tapped & helicoiled to M10x1.00 from M10x1.25mm you could substitute a Type 1 Volkwagen Beetle brake switch for £3.50. All you would need then is spade connectors in place of the bullet connectors. I used a stainless steel brake switch banjo bolt fitted to the 3 way joint at a cost of £10, choice is yours.
Known problems:-
Make sure the front caliper pivot is free to move at every service interval. Do this by loosening the adjusting screw and gently pushing the caliper toward the wheel. It should then swing freely about its pivot arm. WARNING: use the brake lever to pump the pads back home before riding.
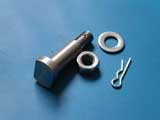
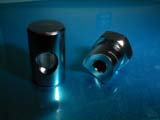
The front caliper support bar has a pin running through it, attached by a stud and a nut at the bottom. Water gets between the pin and bar and causes corrosion, seizing the pin to the bar. Remove, clean and grease the pin (heat may be needed). There is also a sealing o-ring at the bottom of the pin. Fit a slightly oversize o-ring to give a better seal and stop the water entering. Use a high quality synthetic grease like ‘Super Lube’ when re-assembling, NOT copper based types which will seize in half the time.
November 2010 I purchased a stainless steel caliper pin (replaces Honda p/no.45116-323-020) from Phil Denton. At the end of one full years use this stainless pin is still moving freely. As time passes by I will note here when I first need to clean & re-lubricate this part.
The caliper piston can seize causing the brake to stick on and run hot or stick off and not work at all!! Remove the piston and seal. Thoroughly clean the piston and cylinder, especially the seat for the seal. NEVER use anything made from steel i.e. wire wool, try scotchbrite (pan scrubbers) usually a stainless steel dental type pick is required. NOTE: The seal and piston are usually re-useable. Wet or dry any rust on the pistons surface or better still replace with a stainless steel one. Assemble the caliper using brake fluid as a lubricant. The piston should now push home by hand, if not, a G-clamp may help with the bleed screw open.
These early ohc fours were fitted with stainless steel discs making wet braking a problem. There is only one powered piston caliper and not a large contact area for the pads – take extra care in the wet.
Silicone v Glycol brake fluid. Silicone brake fluid is recommended by some restorers and was my chosen fluid. I have now replaced two front brake light switches leading me to believe there is some incompatibility with the Honda system and for this reason I no longer endorse its use. Worth noting, if you once use silicone then you are stuck with it for life, flushing silicone is almost impossible. Choose a quality DOT standard brake fluid and flush at the recommended interval.
Brake noise can be a problem. Clean the rotor thoroughly, first and easiest job. If that fails remove the brake pads clean the rear and sides of each pad and use fresh anti squeal grease on the back and sides of the metal plate of each (NOT THE PAD ITSELF) plus a little on the surface where the pad slides, then reassemble. If the pads have worn enough so that the beveled edge is now flat, sanding the pad edges to make a fresh bevel may also help, DO NOT however remove the red wear indicator when doing so, if either pad is that worn – replace them. Also making sure the pads are aligned correctly by loosening the retaining bolts, hold the brake on full and then re-tighten with the brake still on.
Dirty brake fluid in the master cylinder indicates the need for a clean and re-build. A parts kit is still available for this in 2011.
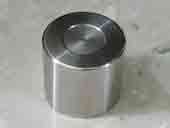
A few stainless bits to finish things off.