The strip down
Now the proud owner of a working? spare engine for £50, I will proceed to document each stage of its restoration. I have set a budget of £600 and will try hard to stick to it. I intend to do all work myself with the exception of cylinder barrel re-bore if needed.
1 Remove the breather and rocker covers. All OEM bolts came undone without any stripped threads. The two cam chain sprocket retaining screws were removed and the camshaft removed along with the two oil pipes. The two rubber oil pipe holders are always hard enough to break up so I like to replace these. Cam followers and tacho drive were removed ready for bead blasting.
2 Remove the cylinder head. All OEM nuts came undone with the exception of the two that lie external to the rocker cover. These are found by the spark plugs on cylinders 2 and 3. ‘Plus Gas’ releasing fluid was applied and left overnight. I then hammered an 11mm socket over the chewed 12mm head, both nuts came undone and will be replaced with stainless steel flange nuts. All valve assemblies were removed, measured and found to be well within specification. The exhaust studs need to be replaced purely for cosmetic reasons. Six of the eight studs came out without any problem, the other two were more of a problem. After applying some heat and releasing fluid, one came out, bringing with it some aluminium and the other simply sheared off at its base. The remains were drilled out using progressivley bigger drill bits. These studs are at a slight angle and an assistant is useful to keep an eye on alignment with its opposite stud. I’ve seen engineers warm to cherry red heat on stuck fasteners, theory is here that it’s better to remove the stud with some of the engines thread attached than to drill out the remains, you will have to helicoil it anway.
3 Lift off the cylinder barrels. The two oil resrictors came out with a little heat. Two dowels on those outside studs were badly corroded and in need of replacement. Heat refused to move these so a large allen key was inserted down the dowel and the dowel squashed onto it using mole grips. This gave good purchase on the dowel and with a twisting motion they were extracted. Cylinder 4 has a deep score running top to bottom, a quick look at piston 4’s ring set revealed the problem. The bottom most oil ring had been bent out of its groove when assembled thus scoring the liner. Re-bore would not have been needed but for this! Finally one of the cooling fins has been damaged, I presume when the former owner replaced the rings!!!!! NEVER locally strike hammer blows to the cooling fins. I use a hardwood baton running across the full length of the engine to tap it free.
4 Generator cover. All the engine covers have had an allen key upgrade in the past., this makes removal quite a bit easier. Remove the name plate and undo the three cross head screws, then remove the cover. Removing the screws that hold the generator coils should allow easy removal of the coils. I had to lever these out and they did seem to be a very tight fit. Closer inspection revealed a crack in the cover where a previous owner must have crashed. Add to auto-jumble list, one generator cover.
5 Drive chain cover. This was removed and revealed missing sprocket and fixing plate. The dowels on this cover are always difficult to remove, I’m going to leave them in and bead blast as usual.
6 Points cover. Not in bad condition for its age but I will replace it for cosmetic reasons.
7 Clutch cover. Came away a little too easily, closer inspection may be wise. On the cover itself the clutch cable adjustment screw was rusted in. Releasing fluid and heat got this out. Removing the four clutch springs etc. I revealed a damaged tab washer and nut, pieces of which were floating round the housing. The friction plates were all stuck via mild corrosion to the plates. When seperated the friction plates were measured and found to be as new, a good cleanup and new tab washer should suffice in here.
8 Oil filter housing. No problem due to 17mm bolt modification. Once more a fin is damged, add to autojumble list.
9 Sump pan. No problem with casing. Oil screen filter has hardened with age and I will replace it.
10 Splitting crankcase halves. I had forgotten just how messy and time consuming the cleanup is especially round the final drive sprocket. Try to sort all parts after cleaning into labelled bags for storage. The camchain adjustment locking screw is perfect for once, but I will helicoil it as future insurance against seizure. I think the camchain is fairly new, but as I am unsure and it has a soft rivet fitted it will be replaced at a cost of £16.45.
The crankcases use some special UBS bolts and are to be re-plated. The only problem screw was the neutral switch retainer. My impact wrench failed to remove it and I had to drill off the head. With the retainer removed the remaining thread came out quite easily with pliers. Crankshaft bearing shells are far from perfect and may require replacement… quite expensive as there are ten of them. Also not perfect are the primary drive shaft bearings, may clean up?
11 Primary drive chain was placed alongside a new one and showed no wear at all.
Shopping List:
Cam chain, 2 x cam chain dampers, 8 x primary drive dampers, oil strainer, stainless steel bolt kit, zinc plating, pipe holders, o-rings various, full gasket set, oil seals, casing dowels, clutch locking tab washer, 0.5mm new OS piston kits & re-bored barrels (a lucky find at £50!!), exhaust collars, generator cover, Oil filter housing, 10 x crankshaft bearing shells, 2 x primary drive shaft bearings.
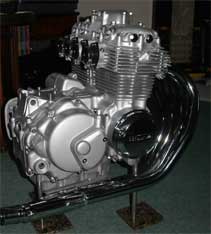 The end result.
Careful riders story:
Recently on a CB400F forum an owner reported the history of his 100,000 mile bike. Never revved beyond 8,000RPM and most mileage covered at a steady 60MPH :-
1 Rear drive chains lasting more than 13,000 miles
2 Cam chain slipper tensioner every 22,000 miles
3 Cam chain at 70,000 miles
4 Re-bore and piston kit at 72,000 miles
5 Clutch plates, springs etc. at 95,000 miles
No reference was made to bearing shells, primary drive chain or gear box. Although now reporting an engine like a bag of nails, it only goes to show that these little Honda fours are very robust.